How to use the Dock on your Mac
When you purchase through links on our site, we may earn an affiliate commission. Here’s how it works.
The Desktop image on Mac (Image credit: Joseph Keller/iMore)
- What is the Dock and what gets displayed there?
- How to add apps to the Dock on your Mac
- How to add files and folders to the Dock on your Mac
- How to remove apps from the Dock on your Mac
- How to organize the Dock on your Mac
- How to change the Dock's size on your Mac
- How to change the Dock's orientation on your Mac
- How to automatically hide or show the Dock on your Mac
- How to hide recent applications in the Dock on macOS Monterey
- Bonus: Pro tips for using the Dock
MacOS comes with a small panel along the edge of the screen called the Dock: It lets you quickly access your favorite apps, files, and folders, as well as any actively-running apps. When you save an item to the Dock, you can access it at any time by clicking on it.
By default, most of Apple's built-in apps start with shortcuts saved in the Dock, but you can also remove those shortcuts and add your own. You can also customize the Mac Dock to fit your preferences. Here's how.
What is the Dock and what gets displayed there?
The Dock has been with the Mac for over a decade now: It offers you a quick way to access the Finder (your Mac's underlying file system) as well as your currently running applications, favorite apps, favorite files, or folders, and the trash.
When you first set up your Mac, your Dock lives along the bottom of your screen in a translucent rectangle. If you don't like its positioning, you can move it to the left or right of the screen or have it automatically hide whenever you're not interacting with it. Items are organized as follows, left to right:
- The Finder
- Favorite app shortcuts
- Currently-running apps (you can also choose in the Dock preferences whether you want to view an indicator (a tiny black dot) for currently-open apps)
- Favorite files or folders
- The trash
Though you can shuffle the position of app shortcuts in the Mac Dock, you can't move the Finder or trash — they live on opposite ends of the Dock, respectively — nor can you mix file shortcuts with apps in the same section.
How to add apps to the Dock on your Mac
- Launch a Finder window from your Dock.
- Click on Applications in the sidebar.
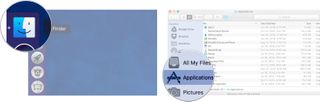
- Select an app and drag it to the Dock.
- Let go of the app while it hovers over the Dock.

If you want to add a currently-running app to your Mac Dock permanently:
- Right-click or Control-click on the app icon in the Dock.
- Select Options under the drop-down menu.
- Click on Keep in Dock.
Alternatively, you can drag the icon to a different position in your Dock, which will automatically save it as a favorite shortcut.
Master your iPhone in minutes
iMore offers spot-on advice and guidance from our team of experts, with decades of Apple device experience to lean on. Learn more with iMore!
By submitting your information you agree to the Terms & Conditions and Privacy Policy and are aged 16 or over.
How to add files and folders to the Dock on your Mac
Files and folders can also be saved to your Dock, but they can only be stored on the far right of the Dock, after your app shortcuts. The Dock has a demarcating line that separates apps from files and folders so that you won't mix them up.
- Launch a Finder window from your Dock.
- Select a file or folder from its location on your Mac and drag it to the right side of the Dock.
- Let go of the file or folder while it hovers over the right side of the Dock.
How to remove apps, files, and folders from the Dock on your Mac
If you don't want a particular app, file, or folder in your Dock anymore, you can remove it with just one gesture. Note that this doesn't remove the item from your computer; it just removes the shortcut from the Dock; you can always re-add the app or folder by following the steps above.

- Select an app, file, or folder and drag it out of the Dock.When it is hovering over your desktop, you will see the word Remove appear above the app, file, or folder.
- Let go of the app, file, or folder. It will disappear from the Dock.
- Repeat the steps above to remove all items you no longer want to keep in the Dock.
Note: If you do this on a currently-open app, it will continue to stay in the Dock until you Quit the application, at which point it will disappear.
How to organize the Dock on your Mac
You can rearrange the placement of apps, files, and folders in your Dock so that they are in alphabetical order, color-coordinated, or however you'd like.
Note: You can't move the Finder or trash icons from the far left and right of the Dock, respectively. They are anchored to the Dock because of their importance to the system.

- Select an app, file, or folder in the Dock.
- Drag it to a new location in the Dock.
- Let go of the app, file, or folder while it hovers over the new location in the Dock.
How to change the Dock's size on your Mac
You can adjust the size of the Dock so that icons are larger or smaller on your screen.
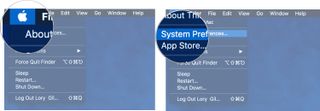
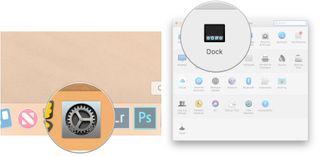
- Click on the Apple icon in the upper left corner of your Mac's screen.
- Select System Preferences from the drop-down menu.
- Click on Dock.
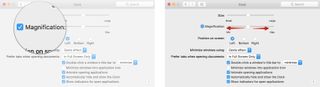
- Drag the Size slider to the left or right to increase or decrease the size of the Dock.
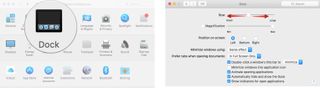
- Tick the box for Magnification to enable an animation that makes the items in the Dock that your cursor hovers over larger.
- Drag the Magnification slider to the left or right to increase or decrease how large the icons grow when your cursor hovers over them.
How to change the Dock's orientation on your Mac
You can display the Dock on the bottom, right, or left side of your screen.
- Click on the Apple icon in the upper left corner of your Mac's screen.
- Select System Preferences from the drop-down menu.
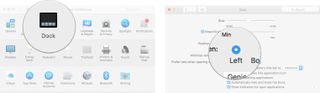
- Click on Dock.
- Select Left, Bottom, or Right to change the orientation of the Dock.
How to automatically hide or show the Dock on your Mac
On smaller laptop screens, every bit of screen space is valuable. So if you don't want the Dock getting in the way of your productivity, you can keep it hidden until you want to access it, at which point, you can call it back up by hovering your cursor over the place where it usually resides.
- Click on the Apple icon in the upper left corner of your Mac's screen.
- Select System Preferences from the drop-down menu.
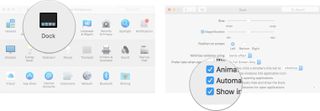
- Click on Dock.
- Tick the box for Automatically hide and show the Dock.
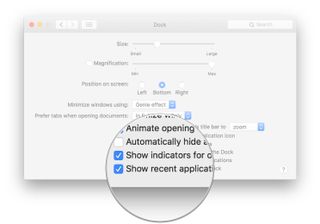
How to hide recent applications on the Dock on macOS Monterey
Much like iOS on the iPad, macOS Monterey puts users' recently-used applications in a special section of the Dock. If this doesn't sound like your cup of tea, it's easy enough to turn off.
- Open System Preferences from your Dock or Applications folder.
- Click Dock.
- Click the checkbox next to Show recent applications in Dock so that the check disappears (it's on by default).
You can check the box if you decide to use this feature.
Bonus: Pro tips for using the Dock
- You can change the size of the Dock by positioning the cursor over the Dock divider that separates apps from files and folders. The cursor will change to a double-sided arrow; click and drag to increase or decrease the size of the Dock.
- You can change the location of the Dock by holding down the shift key, clicking on that divider, and dragging the Dock to the left, bottom, or right sides of the screen.
- If you'd like to keep an app that's open in the Dock permanently, right or control-click the icon in the Dock, select Options, and select Keep in Dock.
- If you want to add spacers between apps, there's a Terminal command to do so.
New Mac?
Are you considering a new Mac desktop or laptop? Be sure to check out our favorite Macs of the year.
